From Low Quality to High Impact: How to Improve the Quality of a Photo Without Re-Shooting
Rescue old shots fast—tune brightness, contrast, sharpness, and noise with Pixflux.AI to reuse assets and keep campaigns agile.
 Sierra CappelenDecember 2, 2025
.png?tr=w-1200,h-600,c-maintain_ratio,q-90,f-webp)
From Low Quality to High Impact: How to Improve the Quality of a Photo Without Re‑Shooting
Deadlines don’t wait for re-shoots. Maybe you got images from a field team shot at dusk, or a product sample arrived late and the only photo you have is soft and noisy. In 2025, when budgets are tight and platforms compress uploads by default, teams don’t always get a second chance behind the camera.
The good news: you can dramatically improve the quality of a photo you already have—brightening exposure, boosting contrast, sharpening details, and reducing noise—without opening a complex desktop suite or booking a studio. Online AI photo enhancers like Pixflux.AI make it fast to decide how to improve photo quality in minutes, keep campaigns agile, and stretch existing assets further.
Below, you’ll learn a practical triage checklist, the editing moves that matter, and a simple 3‑step Pixflux.AI workflow to rehab old images for ads, social, ecommerce, and print.
Why fix instead of re-shoot: budget, speed, and creative agility
- Budget efficiency: Rescue existing assets rather than paying for location, talent, lighting, and post again.
- Speed to publish: Tight timelines—especially on ecommerce, TikTok, and paid social—favor enhancements you can run today.
- Campaign agility: Teams are reusing and remixing content across channels. Freshening older shoots keeps feeds consistent without starting over.
- Smaller gaps vs pro tools: Online AI enhancers have closed much of the gap with heavyweight desktop editors for common quality fixes.
- Batch at scale: Refresh entire catalogs simultaneously to meet seasonal launches or product updates—no manual file-by-file grind.
What “photo quality” really means
Before touching sliders, align on the fundamentals that affect perceived quality:
- Exposure and brightness: Is the subject readable, or crushed in shadows/blown highlights?
- Contrast and midtone clarity: Do edges separate cleanly without looking harsh?
- Sharpness and fine detail: Is the focus crisp, or softened by motion/camera limitations?
- Noise and grain: Are shadow areas speckled, especially in low light or after compression?
- Color and white balance: Are skin tones and brand colors accurate and consistent?
Even small improvements across these areas compound into a dramatic upgrade.
Improve quality of photo: a quick triage checklist
Use this 60-second checklist before editing:
- Identify the subject: What must be preserved (face, product label, texture)?
- Detect exposure issues: Underexposed? Overexposed? Flat contrast?
- Zoom to 100%: Check critical details—eyes, text, product edges—for sharpness and noise.
- Look for distractions: Stray cables, reflections, background clutter, sensor dust.
- Check color cast: Tungsten orange? Fluorescent green? Mismatched brand color?
- Define the output: Web, social, marketplace, or print—target resolution and format dictate how far you push sharpening or denoise.
Tooling choices: desktop editors vs online AI photo enhancers
- Desktop editors (e.g., pro suites) excel in granular control and layered workflows but demand expertise, licenses, and time.
- Online AI enhancers prioritize speed, simplicity, and batch consistency across sets. For common tasks—exposure, contrast, sharpening, denoise, background cleanup—they’re often faster with comparable results.
Pixflux.AI is designed for these everyday production needs: quickly enhance clarity on a lifestyle shot, lift shadows in a product pack, remove a distracting object, or standardize a clean background—all without spinning up a complex PSD. When you’re deciding how to improve photo quality under a deadline, a focused AI workflow keeps you moving.
How to enhance a photo with Pixflux.AI (3‑step workflow)
Use this when you need a fast, repeatable upgrade for ads, product pages, or social posts.
- Upload your original photo Drag and drop or select your file. Start with the highest-resolution version available.
- Let the AI process the image Apply enhancement to boost brightness, contrast, clarity, and sharpness. If needed, use noise reduction to clean low-light grain. You can also remove small distractions or tidy the background for a cleaner look.
- Download the result Review the preview, make minor adjustments if needed, then export for your channel.
Tip: If you prefer more control, repeat the process focusing on one change at a time—first denoise, then sharpen, then adjust contrast—to avoid overprocessing.
- Try it now to enhance image quality in minutes.
- Visual guide: (See image: Pixflux.AI interface with the three-step flow—upload → AI process → download.)
Parameter playbook: the edits that move the needle
- Brightness and exposure: Lift underexposed images until the subject is legible, but preserve highlights. Aim to reveal midtones without blowing out whites.
- Contrast and clarity: Increase contrast to restore separation; add midtone clarity for texture on fabrics, hair, and product surfaces. Stop before edges look harsh.
- Sharpening: Apply after denoise. Sharpen to restore crispness around eyes, logos, or texture lines. Watch for halos around high-contrast edges.
- Noise reduction: In low-light or mobile shots, clean chroma noise first (color speckles), then luminance noise (grain). Keep some texture to avoid a plastic look.
- Color and white balance: Use neutral references (white packaging, gray card) to correct casts. Slightly warm tones for portraits; keep product colors accurate.
- Background cleanup: If your subject is strong but the environment is messy, use Pixflux.AI to subtly remove distractions (like a stray cable) or swap to a clean, on-brand background.
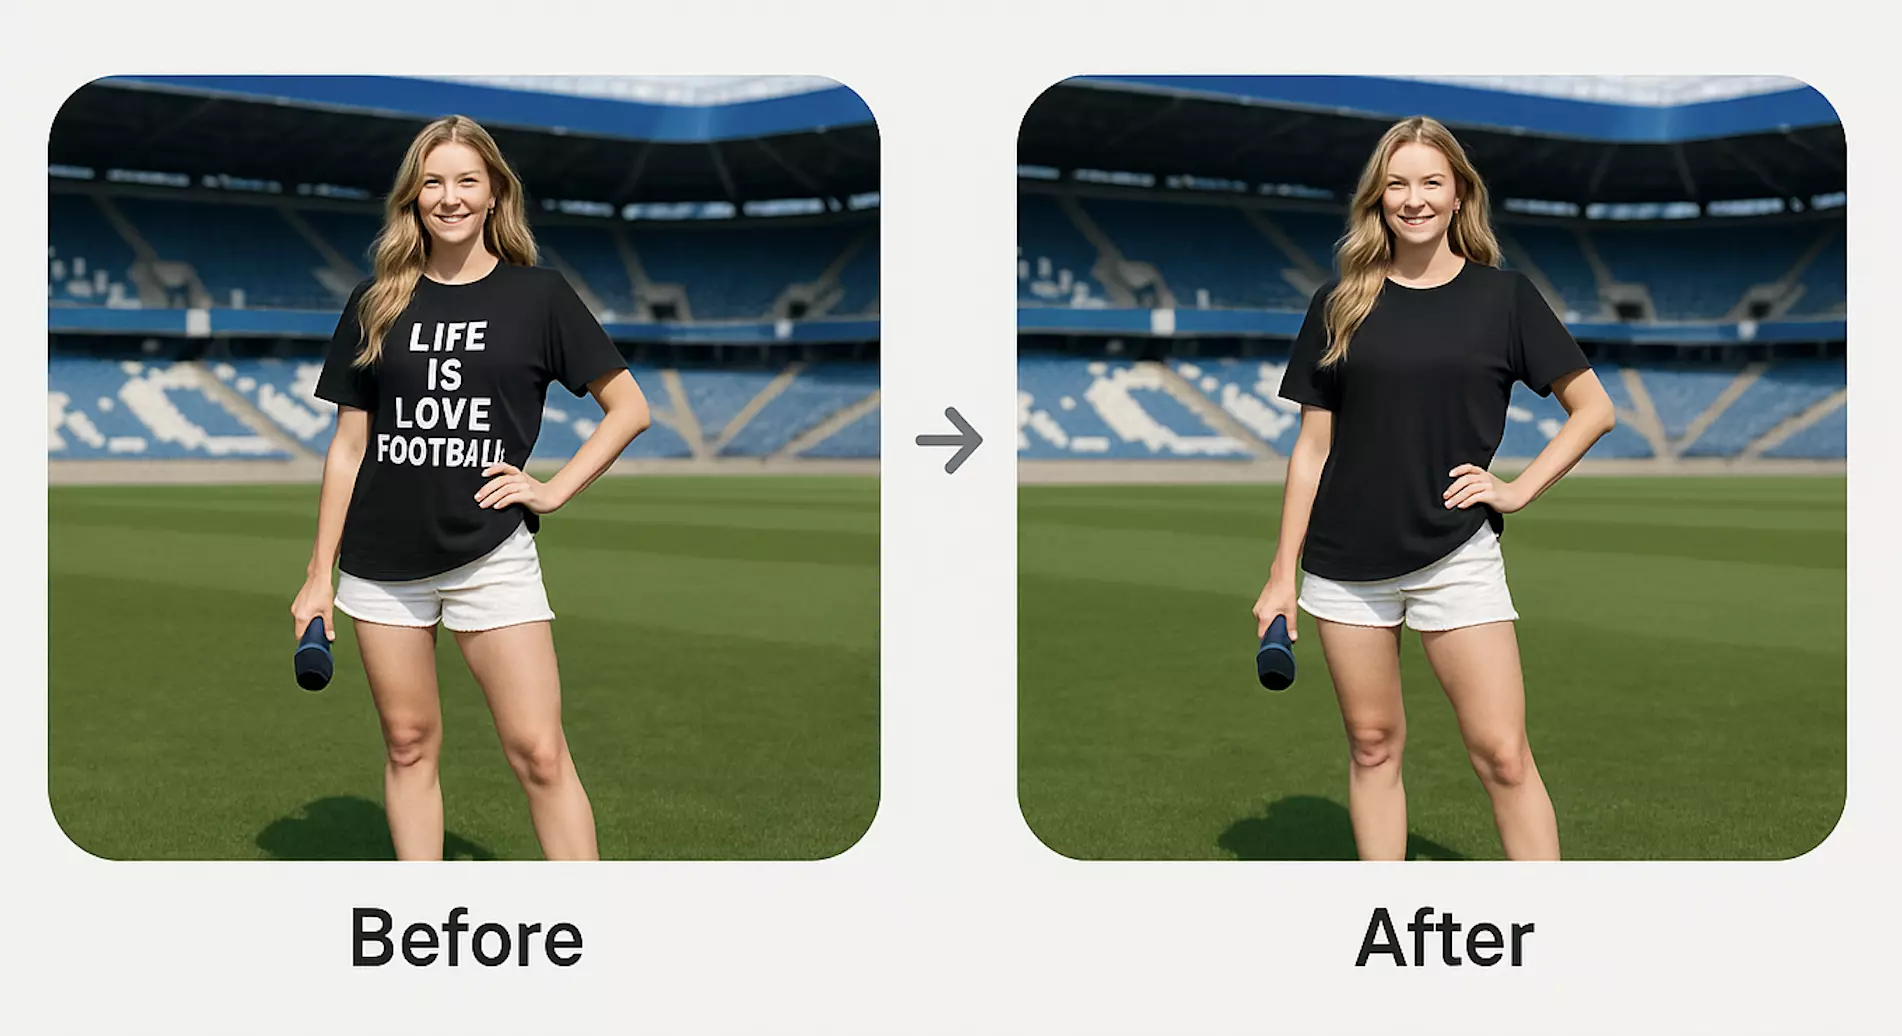
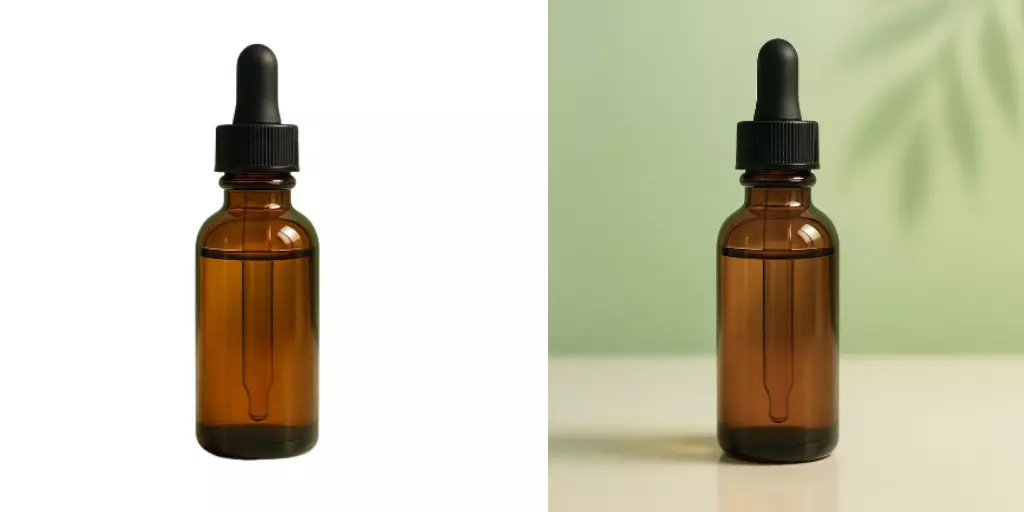
(See image: Before-and-after portrait—low-light shot improved with noise reduction, brightness, and sharpening. Also, a product photo side-by-side with enhanced contrast and a removed distracting cable.)
Batch processing old catalogs for consistency
Refreshing a catalog isn’t just about making one hero image pop; it’s about consistency across hundreds of SKUs. Use Pixflux.AI’s batch processing to:
- Normalize exposure and contrast across product families.
- Apply the same denoise/sharpening profile to archive shots.
- Clean or harmonize backgrounds so your grid and PDPs look cohesive.
- Remove repeated distractions across a series (wires, reflections, minor scuffs).
This is especially helpful before seasonal campaigns or marketplace updates where uniformity boosts conversion and reduces returns.
Case study snapshots: small edits, outsized impact
- Paid social portrait (low light): A dim creator selfie intended for a testimonial ad looked flat and grainy. A quick pass of denoise, a +15 brightness lift, moderate contrast, and selective sharpening around the eyes made it thumbnail-ready without reshooting. CTR improved once the subject popped in-feed.
- Product PDP with clutter: A compact gadget photographed on a kitchen counter had a visible charging cable. Removing the cable and slightly increasing clarity around the logo increased perceived quality, reducing bounce on the product page.
- Campaign background harmonization: Archive lifestyle shots for a footwear brand had busy environments. Replacing a few backgrounds with simple, on-brand textures—and enhancing color accuracy—made a mixed set feel intentional and premium.
Troubleshooting common artifacts
- Halos from oversharpening: Dial back sharpening or add a hint of denoise first. Sharpen only key areas (eyes, logo edges).
- Over-smoothing from heavy denoise: Reduce luminance denoise; reintroduce micro-contrast with subtle clarity.
- Banding in gradients: Export at higher quality settings, try a different format (e.g., PNG/WebP), or add slight grain to hide bands.
- Color shifts after edits: Re-check white balance and contrast. Keep skin tones natural; for products, verify against brand color values.
Ethics and compliance: watermark removal, releases, and authenticity
Only enhance or remove watermarks on content you own or have permission to edit. Pixflux.AI can clean logos or text marks, but do not use this to infringe copyrights or bypass platform rules. Ensure you have model/property releases where required, and clearly disclose edits if your context (e.g., journalism) demands authenticity notes.
Quality control and export: web, social, and print in 2025
- Web and ecommerce: JPEG or WebP at high quality, sRGB color space, 1600–2560 px longest side. Mind platform compression; gentle denoise and restrained sharpening prevent artifacts.
- Social: Size to each platform’s recommended dimensions. Prioritize midtone contrast and clean edges for small-screen clarity.
- Print and OOH: Export at 300 dpi, check shadow detail and neutral grays, and proof critical brand colors.
Before publishing, view at 100% on a calibrated display and at typical device sizes. If the subject reads clearly at a small mobile thumbnail, your enhancements are on target.
AI online tools vs traditional methods
- Time to result
- AI online: Minutes to great defaults; ideal under deadline.
- Traditional: Longer sessions to set up layers, masks, and noise/sharpen stacks.
- Learning curve
- AI online: Guided settings fit non-designers and marketers.
- Traditional: Steeper learning, requires repeatable technique to ensure consistency.
- Batch efficiency
- AI online: Process many images in one go for catalog refreshes.
- Traditional: Actions/presets help, but still demand careful manual checking.
- Team handoff
- AI online: Simple, consistent workflows that different teammates can run reliably.
- Traditional: Complex files and plugin dependencies slow collaboration.
For most everyday production needs—especially when you need to improve the quality of a photo at scale—Pixflux.AI’s streamlined workflow reduces friction without sacrificing results.
Advanced workflow (optional 5‑step)
When you want extra control, try a more deliberate pass:
- Open Pixflux.AI.
- Upload the highest-resolution file available.
- Choose Enhancement to lift brightness/contrast and enable denoise or sharpening as needed. If distractions exist, remove objects or switch to a cleaner background.
- Preview and fine-tune: Compare before/after, watch edges for halos, and confirm color accuracy.
- Download in the right format and size for your channel.
If you’re taking your first steps, this structured flow helps you reliably enhance image quality without overprocessing.
Final checks: a simple QC list
- Subject is clear at thumbnail size, and edges are natural—no halos.
- Noise is controlled, but texture remains lifelike.
- Colors look accurate across devices.
- Background supports the subject rather than competing with it.
- Export settings match the destination platform.
Conclusion and next steps
You don’t need a reshoot to turn a soft, noisy, or flat image into something campaign-ready. With a quick triage, a handful of targeted adjustments, and a streamlined AI workflow, you can revive archives, maintain brand consistency, and ship faster.
Start with one asset today: upload, enhance, and export. If you’re evaluating tools, try Pixflux.AI’s focused workflow to improve quality of photo and keep your content engine moving.